A program for connecting computers to each other. How to connect two computers to each other in a single network
30 47 721 0
Why might you need to connect one PC to another PC? The goals can be very different - ranging from the desire to play something, to the banal copying of files. Be that as it may, every user who considers his level of knowledge in this area above average should be able to connect a computer to a computer. There is nothing complicated in connecting two computers: it is enough to get a network cable, or a special PC-Link device, with which you can connect 2 computers to each other via USB. So let's get started!
You will need:
Network cable
So, where do we need to start if we have already begun to connect two computers? That's right, with their connection! We insert one end of the twisted pair with a connector into the Ethernet port of a computer or laptop. It looks like this.
The second end, in turn, is inserted into another PC. This completes the physical connection process. But this is not enough - if we connect 2 computers in this way, then we will not get anything but an “empty” network connection. Indeed, in order to connect two computers to each other and use certain functions, they must be configured in a special way, which we will now do.
Connection setup
Right-click on the network connection icon in the system tray, and select "Network and Sharing Center".
In the "Change adapter settings" section, look for Local Area Connection, open its properties, and then go to the TCP / IPv4 protocol settings window.
We specify the following parameters there: IP - 192.168.0.n (n is any number from 0 to 250); subnet mask: 255.255.255.0.
USB cable
Connecting two computers together USB help cord with an LC-Link device. After that, with installation disk, which comes with the device, install the drivers for PC-Link on both machines (insert the disk into the drive, select the "Install driver" or "InstallDriver" item in the autorun menu, and then follow the instructions).
If you want to play on two PCs without using the Internet, instantly transfer files from different devices without USB media, then you need to know how to create local network between two computers. This technology for connecting two PCs has been used for a long time, and even today it has not lost its relevance.
LAN Example
A local network is a group of interconnected devices: PCs, TVs, printers, usually located no further than one room. Devices use shared memory, servers, thus complement each other. Such a connection allows you to create a gaming zone for several PCs, transfer any data freely and fairly quickly, print documents if one shared printer is installed, and do much more. Combining devices today is more often done using a router, but other connections can also be used, which you can read about below.
Create a connection
It is quite easy to create a connection, as well as in different ways: through a router or cable. The device settings for both methods are quite similar. The difference lies mainly in the connection method: via cable or via Wi-Fi.
Communication via Wi-Fi, which is much more common today, can be much more convenient, but connecting two PCs with a cable will cost less if you have not yet installed a router for some reason.
Connection via cable

The oldest form of communication between two machines. It only needs to connect an RJ45 network cable. The cable must be crossed, although for modern computers regular straight cables can often be used. Nevertheless, when buying, it is better to check the type of cable with the seller. When adding the ends of a crossover cable, the colors of the ends of the wires will differ - this is its main difference. Also, the connection requires network cards on both devices, but today they are already installed. One has only to note that if the network card is already busy connecting to the Internet, then you will not be able to use it.
Such a connection was just used before in order to play. But someone might be comfortable today, especially if you still have Windows XP operating system, which hardly supports wireless connections.
After connecting the cable itself, you need to know how to set up a local network between two computers:
- Control Panel, select the item relating to network connections.
- We select the one we created there, right-click on it, select "Properties"
- Further, depending on the "Windows": for Windows XP, select the Internet Protocol (TCP / IP), for Windows 7/8/10 - Internet Protocol version 4.

- Manually enter the IP address: 192.168.xxx.xxx. The last six digits can be entered independently, the main thing is that they do not repeat for different devices.

- On Windows 7, you will also need to go to the Network and Control Center, there, through the "Settings" item, select "Private" for our network.
- Then in the Control Center, enable file sharing, network discovery, and disable password protection.
After that, you must also set up sharing. This is done so that PCs can exchange any files. Methods differ on different OS. On WindowsXP:
- Section Network connections, go to "Tools", select "Folder Options".
- View tab, check the box next to Use simple file sharing.
- Next, go to the "System Properties" window: RMB on "My Computer" - select Computer Name.
- Click "Edit", select "Is a member" - working group. We come up with a common group name for both PCs.
- My computer, right-click on hard drives (for example, Windows (C :)), in the "Access" tab, click on the link, set the sharing permission.
That's it, access to the files of the selected disks is completely open. With Windows 7/8/10 we proceed as follows:
- Control Panel, then Folder Options.
- Check the "Use Sharing Wizard" checkbox.
- The following steps will be the same as for XP.
Connection via router

This is the most convenient method, as it allows you to connect not only two, but more computers or other devices that support Wi-Fi. You can play on such a connection without long settings.
IP-addresses with such a connection will be set automatically. To use shared files, you will only need to share files, and then add two computers to the same workgroup, as described above.
Now, to transfer files, you just need to enter, using the address bar, the computer name: \\name\. You can also do this through the Network Connections section. It is also worth securing your personal or especially important files so that no one can access them from a neighboring computer. To do this, it is best to specify disks that do not contain information that is important to you. For example, a disk containing data accounts users, it is better not to make it open to everyone, or, using the settings menu for files and folders, restrict access to them: RMB on the desired folder, then select the sharing settings there.
LAN game
So, we managed to connect two devices to the same network without the Internet, let them exchange files. How to start playing on a local network?

For this, as a rule, no additional settings are needed. We just turn on the game and, if it is possible to play on a local connection, select the appropriate item, and then play on the one we have already created.
For different games, the connection to the shared server may vary. Somewhere you will need to enter the IP or PC name. For Minecraft, Counter Strike, for example, you will need to create a server. But as a rule, everything is done quite simply.
Hamachi
This happens quite rarely, but sometimes a game does not allow you to play via the Internet, but it allows you to play on a local network. Do not despair, even if it turned out that your friend lives far away from you.
The Hamachi program allows you to emulate a local connection and thus connect a PC to it via the Internet. To do this, you just need to download the program, register, and then create a new connection, come up with a name for it and, if necessary, a password. After that, you can easily use this network to play the game.
As you can see, connecting computers to a local network is a fairly easy process. It doesn't take much of your time, and you can connect two PCs and then play with friends, both away from them and being in the same room with them.
Ways to create a connection are suitable for all Windows, starting with XP, ending with the "Ten".
Good day!
Eh, if in the 90s of the last century a computer was a luxury, now many people have not one, but several computers / laptops at home. If you connect computers to a local network (in which there will even be only 2 devices), you can get undeniable advantages:
- the ability to open files located on another PC, work with them, etc. Now you do not need to run back and forth with a flash drive or disk;
- the ability to make a network printer (scanner, CD / DVD drive, etc.), and use it from all PCs in the local network;
- the ability to play network games (this is a separate and most interesting opportunity, which can be talked about for a long time).
In this article, I wanted to consider the issue of building a home local network (and setting it up), which will be useful to all novice users. I will follow the path of step-by-step analysis, I will start with the question of connecting one PC to another, then I will consider Windows setup, and how, in fact, to share (make available to the local network) folders, printers, etc. So...
When creating a home local network, most often, two options are used:
- connect two computers (PC to laptop, PC to PC, etc.) using a cable (it is often called twisted pair);
- get a special "box" called a Wi-Fi router. A PC is connected to the router using a network cable, and laptops, phones, tablets, etc. devices get Internet access via Wi-Fi (the most popular option today).
Option number 1 - connecting 2 PCs using twisted pair
Pros: simplicity and cheapness (you need 2 things: a network card, and a network cable); providing a sufficiently high speed that not every router is able to issue, a smaller number of radio waves in the room.
Cons: extra wires create confusion, get in the way; after reinstalling Windows OS - network setup is required again; for Internet access to be on the second PC (2), the first PC (1) must be enabled.
What is needed: that each PC has a network card, a network cable. If you plan to connect more than 2 PCs to a local network (or if one PC is connected to the Internet and is on the local network at the same time), one of the PCs must have 2-3 or more network cards.
In general, if both PCs have network cards, and you have a network cable (also called an Ethernet cable), then connecting them with it is not difficult. I don't think there is much to consider here.
Note: Please note that network cards usually start to turn green (yellow) LED when you connect a cable to it.

Another important point!
Network cables for sale are different: and not only in color and length. The fact is that there are cables for connecting a computer to a computer, and there are those that are used to connect a PC to a router.
For our task
needed crossed network cable (or cable pressed in a cross way- here who calls it).In a crossover cable - on the end connectors, the yellow and green pairs are reversed; in the standard (for connecting a PC to a router) - the colors of the contacts are the same.

In general, if two PCs are turned on, working, you connected them with a cable (the LEDs on the network cards blinked), the network icon next to the clock stopped displaying a red cross - that means the PC has found the network and is waiting for it to be configured. This is what we will do in the second section of this article.
Option number 2 - connecting 2-3 or more PCs using a router
Pros: most devices: phones, tablets, laptops, etc. will have access to a Wi-Fi network; fewer wires "underfoot", after reinstalling Windows - the Internet will work.
Cons: purchase of a router (after all, some models are far from cheap); "complicated" device setup; router radio waves ., lower ping and freezes (if the router can not cope with the load).
What you need: a router (it usually comes with a network cable to connect one PC to it).
With the connection of the router, as a rule, there are also no big problems: the cable coming from the Internet provider is connected to the special. router connector (it is often called "Internet"), and local PCs are connected to other connectors ("Lan-ports"). Those. the router becomes an intermediary (an example diagram is shown in the screenshot below. By the way, in this diagram there may not be a modem on the right, it all depends on your Internet connection) .
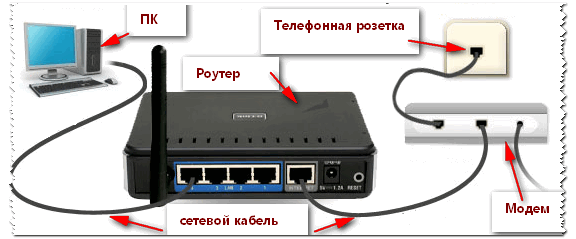
By the way, pay attention to the LEDs on the router case: when you connect the Internet cable from the provider, from the local PC, they should light up and blink. In general, setting up a Wi-Fi router is a separate big topic, besides, for each router, the instructions will be slightly different. Therefore, it is hardly possible to give universal recommendations in one single article ...
By the way, when connecting through a router, the local network is usually configured automatically (that is, all computers connected via a network cable should already be on the local network, there will be a couple of small touches (about them below)). The main task after that is to set up WiFi connection and internet access. But since this article is about the local network, I do not focus on this ...
LAN setup (Windows 7, 8, 10)
In this subsection of the article, I will give universal instructions, regardless of how your local network is organized: connected via a network cable, or using a router. Where the settings will relate to a specific option - there will be notes.
Note: all settings are relevant for Windows 7, 8, 8.1, 10.
Computer name and workgroup
Allegory: each person has his own name, surname, patronymic, date of birth, city, etc. - No two people are the same. It is the same in the network - there should not be computers with the same name ...
The first thing to do when setting up a local network is to check and configure workgroup name and computer name. Moreover, you need to do this on each computer in the local network!
To find out the computer name, open the Windows Control Panel at: Control Panel\System and Security\System (screen below). Next, make sure the following:
- PC name and slave. the group must be in Latin;
- each PC / laptop in the local network should have its own unique name(for example: PC1, PC2, PC3);
- Every PC/Laptop should have same working group (for example: WORKGROUP).
To change the name and working group - click the "Change settings" button.


Change workgroup and PC name
In general, when you bring all the names in accordance with the requirements above, you can proceed to the next step of the setup.
Turn on printer and folder sharing
Relevant for connecting through a router, and directly ...
This innovation appeared in Windows 7, supposedly provides more security for the OS (in my opinion, it only creates the need for additional local network settings). The bottom line is that, by default, Windows blocks and does not allow access to open and share folders, a printer, etc., until the security policy is "softened".
To remove this lock and enable sharing, you need to:

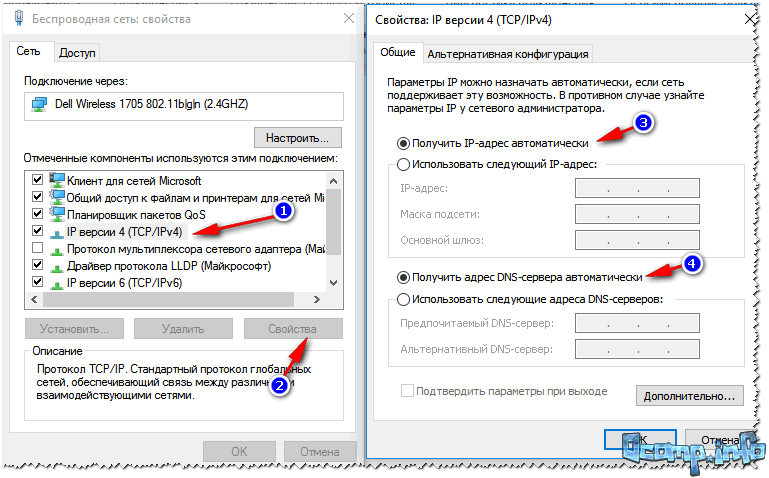
Setting up IP addresses, DNS, masks, gateways
For a network organized using a router
In general, for PCs connected to a local network using a router, usually nothing needs to be configured (everything works by default). If something is wrong, just in case, I recommend that you go in and check the connection properties.
To do this, you first need to open "network connections" . This is done simply:
- first open the window "Run"- combination of buttons Win+R;
- then enter the command ncpa.cpl and press Enter(works in all Windows versions 7, 8, 10).

How to open network connections // ncpa.cpl

Local Area Connection Properties
To connect PC to PC via network cable
PC 1
By PC 1, I mean a computer that has two network cards: one of them is connected to the ISP's Internet cable, and the second is a local network cable that goes to PC 2.
Note: although, the Internet cable from the provider does not have to be. If it is not there, choose PC 1 and PC 2 - arbitrarily ...
And so, we open network LAN connection properties(how this is done - see a little higher in the article).
- IP address: 192.168.0.1;
- subnet mask: 255.255.255.0 (see screenshot below);
- save your settings.

AT properties of IP version 4 (TCP/IPv4) second PC, you need to set the following parameters:
- IP address: 192.168.0.2,
- subnet mask: 255.255.255.0;
- default gateway: 192.168.0.1;
- preferred DNS server: 192.168.0.1 (see screenshot below);
- save your settings.

Actually, the local network setup itself is finished. Now you can proceed to the most interesting part - sharing and using the shared resources of the local network. Exactly what we were going for...
Sharing Internet access on a second PC
Relevant for PCs connected directly by LAN cable...
You need to configure PC 1 (i.e. the one to which we have the provider's Internet cable connected).
First we open network connections : press combination Win+R, enter ncpa.cpl, Further Enter .
How to open network connections //ncpa.cpl

Next, open the tab "Access", and check the box next to "Allow other network users to use this computer's Internet connection" . Save your settings.

Allow other users to access the internet
If everything is done correctly, the Internet will be on both computers.
Note: of course, for the Internet to be on PC 2 - PC 1 must be turned on! This, by the way, is one of the inconveniences of such a local network, when connected through a router - the Internet will be regardless of which PC is on / off.
Sharing folders/files for public access

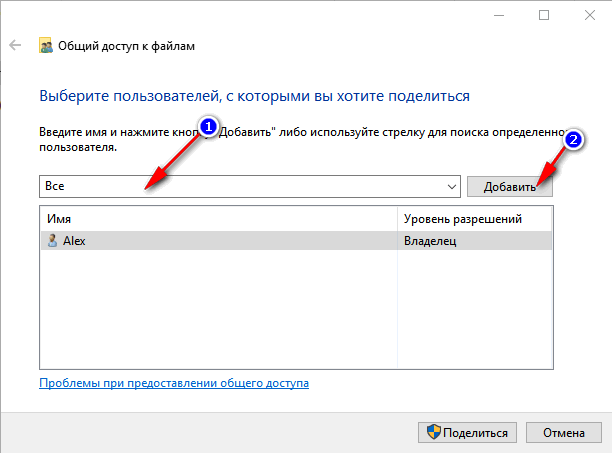
3) Set the resolution: read or read and write.
Note:
- allowed to read: users can only copy your files to themselves (neither delete nor change - they can't!);
- read and write allowed: LAN users will have full control over files in folders: they can delete all files, change any of them, etc. In general, I would not recommend giving such access to important and large folders (to transfer files, it is better to have a separate folder, to which you give full access).

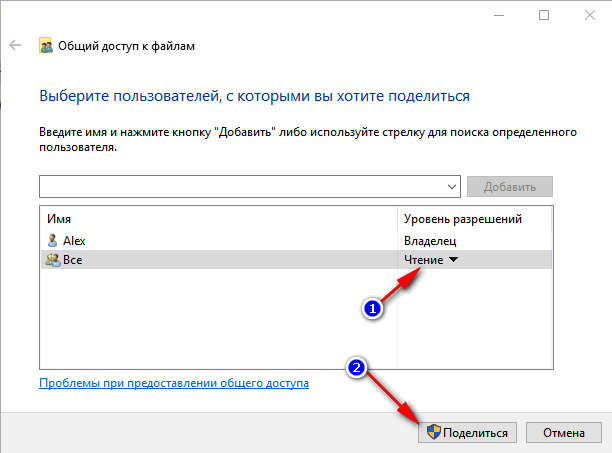
5) After a few seconds, Windows will report that the folder has been shared. So everything went well.

6) To access the folder:
- open the explorer;
- then open the "Network" tab (on the left, at the bottom of the window);
- open computer name, on which the folder was shared. As you can see in the screenshot below, it is shared, you can go into it and start copying (reading) any files.

Printer sharing (shared network printer)
1) The first thing to do is open the control panel: control panel/hardware and sound/devices and printers.
3) Then open the tab "Access" and check the box "Sharing this printer" . Save the settings (see screenshot below). Actually, now the printer is shared and it can be used by other PCs / laptops / tablets and other devices on the local network.

How to share a printer
4) To connect a network printer, open conductor, select computer name , on which the printer is shared. Next you should see it: click on it right click mice and select the option from the menu connections .

How to connect a network printer
5) Then you can open any document, press Ctrl+P (File/Print), and try to print a friend page.
Note: By default, Windows typically lists a different printer (not the one you have connected over the network). Do not forget when printing - change it.
Regarding the local network printer - I recommend that you read my detailed article on this topic. It covers some of the points in more detail. Link below.
"Creating" a network printer -
I am finishing the article on this. Good luck and fast setup.
Do you want to know how to connect two PCs or laptops according to the "cable computer computer" scheme? It is not as difficult as it seems at first glance. The main thing is that you have a cable. And here it is important not to make a mistake. Therefore, read everything that I am writing to you here very carefully and in order. It is important!
Larry Roberts first came up with the idea to connect two computers with a cable back in 1967. In fact, this is how the Internet came into existence. Therefore, we can safely say that by connecting a computer to a computer with a cable, you will create your own personal Internet network. And you need to start with the selection of the cable.
What cable can connect two computers?
The first thing that comes to mind is to connect two computers via USB.
And this, at first glance, is the right idea. Most PC users almost always have it at hand. Or somewhere in the drawer of a computer table, this USB extension cable is gathering dust for sure. It would seem: stuck one end of the extension cord into one USB port, and the second in the second and "it's in the bag." But here the problem is that the connectors at the ends of the cable are different for some reason, and do not fit in any way.
Or rather, they fit, but only to one USB connector of the computer, and to the second, then nothing ...
 USB extension cable
 And it's very good that they don't fit! Otherwise, if you connected computers with a cable via a USB port, you would definitely damage them. The fact is that USB ports computers were not originally designed to directly connect two computers.
There are several technical nuances that hinder this.
I will not voice them all, and I will only say that any USB port produces outgoing voltage, which feeds the connected peripheral devices. And by making a connection through the USB port according to the cable computer computer scheme, we will get the output voltage coming from both sides. And it's not hard to guess how it's all going to end. Fireworks of course will not work, but USB ports will stop working on both computers - this is at least.
So is it possible to connect two computers via USB?
Yes, you certainly may! But this requires not a simple, but a special USB cable. It looks something like this:
 In this photo the cable is: PC-Link USB Bridge Cable Link-100
 In fact, almost all manufacturers of computers and peripheral equipment now produce such cables. Go to any computer store, or at least a stall selling batteries and mobile phone chargers and ask for a USB cable to connect two computers and they will sell it to you.
How to use a USB cable to connect two computers
Each model of such a cable has its own connection and configuration, which can vary greatly from each other depending on the manufacturer. Therefore, write here something like: "Plug one end of the cable into one port and the other end into the other..." I just don't see the point.

 Another, of many, USB cable option for connecting computers
 Instructions are usually included with the device. After purchasing this connector, be sure to carefully read the provided connection manual. If, suddenly, there is none, then try to find it on the manufacturer's website, the URL of which is usually indicated on the product packaging.
But that's not all. There is an alternative way to connect two computers with a cable, which has a number of advantages.
Cable computer computer - method number two
Connect two computers with an Ethernet cable
But here, as always, there are nuances. A regular Ethernet cable, the one with which we connect to the router, or directly to the provider's network will not work. For connection according to the scheme "cable computer computer" in this case, a special crossover cable (crossover) is required.
 Crossed network cable
 Visually, it practically does not differ from a regular cable for connecting to the Internet. But he has a patch cord (patch cord) crossed. In other words, the cable layout is slightly different.
Patch cords for connecting computers are of two types: four and eight core. Here are examples of twisted pair cabling for connecting two computers to each other.
 Four wire cable
  Eight-wire cable (option No. 1)
  Eight-wire cable (option #2)
After you purchase a cross-cable, you can start connecting according to the scheme "cable computer computer".
How to Connect Two Windows Computers
 We insert the cable into the corresponding sockets of both computers.
 All further settings are shown on the example of the operating room. Windows systems 7. On other operating systems of the Windows family, the connection scheme and settings are approximately the same.
2. Click on the "Start" button and in the search box enter the phrase: " View network connections".

2. A window with network connections will open, in which you need to select "LAN connection". Hover the mouse over it and go into it "Properties".

3. Find the Internet Protocol version 4 (TCP / IPv4) and click "Properties".

IP address: 192.168.1.1
Subnet mask: 255.255.255.0
fields Main gate and DNS servers can be left blank.

5. On the second connected computer, we prescribe the IPv4 parameters exactly as on the first computer, only enter another IP address 192.168.1.2 and save the entered parameters.

This completes the setup for connecting two computers with a cable. You also need to check the performance of all the settings made.
Checking the connection between two computers
Before you start using our local connection, you need to make sure that we have correctly configured the data transfer and the protocol packets pass without interference and loss.
1. To do this, on any of the connected computers, call the command line window by pressing the key combination and enter the command: cmd - click "OK"

2. In the command line, for example, on a computer with an IP address of 192.168.1.1, execute the command: ping 192.168.1.2

If as a result of this test you get data as in the figure above: sent = 4, received = 4, lost = 0, then you did everything right.
A similar operation must be done from the second computer. Since you need to make sure that the packets come from it too. Since there are cases that can block communication or Windows Firewall. And even better, for the period of setting up and connecting two computers, turn off the Firewall altogether. After making the settings, you can try to turn it on (unless, of course, it will interfere with the operation of this connection).

And get access to it

Have a nice work!

So far, nothing suitable has been found.
If you have two computers, then you will probably want to connect them together via a network cable and thereby create a small network that can be used to transfer data between computers or joint online games. In this article, you can read the instructions that will help implement this idea.
Step #1. Preparing to connect your PC to your PC.
In order to connect two computers together, you need a crimped network cable. If you do not have such a network cable, then you need to make it or buy it ready-made. If you buy ready-made, then make sure that it is crimped as a crossover (crossover).
In order to understand that the cable is crimped properly, pay attention to the conductors in the connectors at both ends of the cable. The orange and green pair of conductors should be sort of mixed up with each other (see picture below).
If you crimp the network cable yourself, then you will also need RJ-45 connectors and a crimping tool (crimper). You can read more about how a network cable is crimped here.
Step number 2. We connect two computers to each other via a network cable.
This is the easiest step. You need to plug each side of your network cable into the network card slots on both computers. Immediately after connecting the cable to two computers, the LED inside the connectors should light up, indicating that the network cards have begun to exchange data.

If there is no light indication after connecting the cable, this means that the network cards do not see each other. Most likely, you either have one of the network cards turned off, or a faulty network cable. This issue must be corrected before proceeding to the next step.
Step #3. Network setup.
After two computers are connected by a network cable, you can start setting up a network between them. To do this, open the "Control Panel" on one of the computers and go to the "Network and Internet - Network and Sharing Center" section. In this window, click on the link "Change adapter settings".

This will open the Network Connections window. All network cards on your device are displayed here. Find the one network card to which you connected the network cable and open its properties.

After that, select the item "IP version 4" with the mouse and click on the "Properties" button.

After that, a window with the properties of the IP protocol will open. Here you need to select the item "Use the following IP address" and enter the IP address 192.168.1.1 and the subnet mask 255.255.255.0. The rest of the fields do not need to be filled in.

After that, close all open windows by clicking on the "Ok" button in order to save the changes and go to the second computer. In order to connect two computers to each other in one network, all the above described procedures must be repeated on the second computer. The only exception is the IP address. In order for the network to work, the IP addresses must be different. That's why, on the second computer, you need to specify the IP address 192.168.1.2.

And just like the first time, close all windows on the second computer by clicking on the "Ok" button.
Step number 4. We check the connection between the two computers.
Once the IP addresses are set, you can test the connection between the two computers. To do this, on one of the computers, press the key combination Windows + R and in the window that opens, enter the command " cmd».

This will open the Windows Command Prompt. Now enter the command " ping IP”, where instead of “IP”, substitute the IP address of the second computer. For example, if command line is running on a computer with an IP address of 192.168.1.2, then you need to enter the command " PING 192.168.1.1».

If the computers were connected correctly, then you should get all 4 sent packets back. If the packets are lost, then somewhere a mistake was made and the network is not working.
New Articles
- "Samsung" or "iPhone", what is better to choose, what is better and in what?
- How to update Android - flashing a smartphone to the latest version How to flash android to version 6
- Old horse, does not spoil the furrow
- Means of long-term storage and accumulation of data Used for long-term storage of information and transmission
- how to clean junk from iphone how to clean iphone 5s with itunes
- Shortcuts disappeared from the desktop, what should I do?
- Missing desktop and shortcuts
- Hard Drive Data Recovery
- Direct mass mailing of messages on instagram Service for collecting messages direct instagram
- How to open ports on a computer How to open port 1701
Popular Articles
- Privacy settings VKontakte
- How to hide friends in VK How to hide a person in friends in contact
- How to open ports on windows How to open ports on a windows computer
- How to Change Text in PDF Format: A Few Simple Methods
- Electronic payment system "Comepay
- RBK Money: replenishment from the card and withdrawal to the Rbk money card the payment system works
- A single wallet - what is it and what is it eaten with?
- Can you charge your phone in the microwave?
- Rating of the best subwoofers for the car
- Modern smartphones with qwerty keyboard